


Steering Wheel Fitting Instructions
Whilst the installation of your Sports Wheel is relatively simple, it is very important that you follow the fitting instructions step by step in order for it to be fitted correctly.
1) Before removing your original wheel, make sure the front wheels of your car are in a straight position. It is important that these are aligned straight, otherwise your new wheel may be fitted out of line.
2) DISCONNECT Battery.
(Only if horn mechanism is attached to your wheel.)
3) Remove horn mechanism. This is normally done by one or more of the following steps:
a) Press down on the horn cap or ring, and turn.
b) Remove emblem cap from its snapped position by grasping it and pulling toward you, or pry loose.
c) Horn ring and emblem may be held by screws, which are concealed in rear side of wheel spokes.
If one of the above procedures cannot remove all horn parts, it will have exposed the remaining screws to permit easy removal of the balance of such parts.
4) Mark end of shaft indicating top of wheel with front wheels straight ahead.
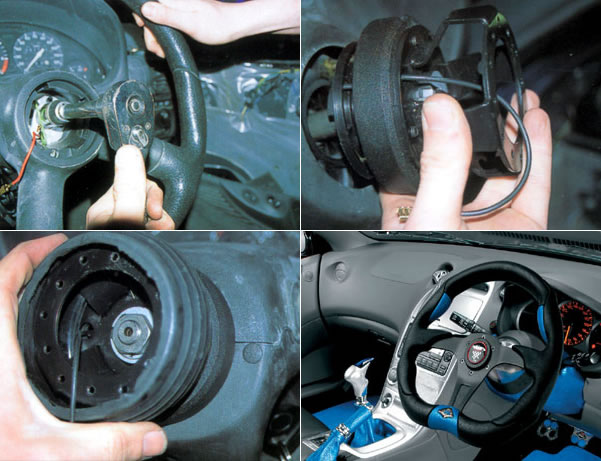
5) Loosen NUT on the shaft and then attempt to remove the steering wheel. – see images below
6) If the steering wheel cannot be removed easily by hand, a proper steering wheel puller should be used to avoid any damage to the steering wheel.
7) You are now left with a splined shaft. Place your SAAS Boss Adaptor/Hub on the shaft in line with the top marks on the shaft and Adaptor, rock slightly making sure the spline on the Adaptor locates on the shaft’s spline.
8) Screw nut into position; bump slightly so the taper grips. Be careful, do no over tighten the nut, as you may have to position the wheel again after a short test drive, if it is not correct.
9) Place Steering Wheel and Horn plate (if applicable, ridge face upwards) on Adaptor. Make sure the steering wheel holes line up to the appropriate holes on Adaptor. Tighten the 6 Allen key screws supplied securely (do not over-tighten).
10) Reconnect Battery. Your car is now ready to road test to see whether your wheel is in correct line or not (100 metres driving slowly is enough.)
11) After road testing, tighten the centre nut down at least 20 P.S.I. (Do not use a tightening torque over 5mkg.) This is very important otherwise the wheel will loosen after a short period of time and strip the wheel spline.
12) Horn connection
Some Types of Holden and Commodore, Torana’s.
On some Holdens and Commodores, including HK and HQ, the plastic piece with pick up ring attached on original wheel must be removed and fitted to your SAAS wheel with the original screws.
Other types of Vehicles
As a general rule most other vehicles except for some current models with horn assemblies separate to the wheel are easily connected. This is the case where you see a horn wire protruding from the rear of the wheel. Simply connect wire to centre clip of horn button provided, and press horn button into the position flatly and tightly.
13) In some wheels, the horn assembly is not supplied, and if this is the case with your wheel, the original assembly is needed in conjunction with your SAAS wheel.
14) WARNING! Your SAAS Hub/Boss Adaptor must be a perfect fit. If you are unsure, do not drive your vehicle – consult your nearest SAAS Distributor and check whether the correct Part Number has been supplied.
IMPORTANT
1) Do not attempt to replace a steering wheel that is fitted with an air bag. This is dangerous and this job should be carried out by a professional.
2) When you remove your Steering Wheel from your car, please use a suitable steering wheel puller (do not use two hands to pull wheel). Failing to do it will result in DAMAGES to the Wheel (especially for Wooden Steering Wheels), and Guarantee will be void.